Tutorials
Jazz Platform Jedi IDE Hello World in many flavors!Installing from the Git sources repository
To install Jazz from the Git sources repository you will need :- Git installed on your machine
- See Dependencies for Jazz external dependencies.
$ git clone git://github.com/jazzscheme/jazz.git
Initialized empty Git repository in ~/jazz/.git/
got 0bf73166990a41c20627f6b935317bdc25a4e257
...
walk 1ba2fb1ad98ed81b62e2827639b71d6ec9b0ae9c
Checking out files: 100% (3284/3284), done.

$ cd jazz
Build Jazz The build system follows the usual configure / make methodology but as the underlying Scheme system already represents a platform independant abstraction, there is no need to use the low-level GNU tools. The build system is fully implemented in Scheme, accessed using the ./jam script.
$ ./jam
JazzScheme Build System v2.6

% configure
<default>
  system: gambit
  platform: windows
  safety: release
  ...

% make
...

% quit
Try out the samples You will find the Jazz kernel executable inside the "bin" folder. You launch a sample by using the -run command.
$ bin/kernel -run c4
Installing from the Git sources repository
To install Jedi from the Git sources repository you will need :- Git installed on your machine
- See Dependencies for Jazz external dependencies.
$ git clone git://github.com/jazzscheme/jedi.git
Initialized empty Git repository in ~/jedi/.git/
got 0bf73166990a41c20627f6b935317bdc25a4e257
...
walk 1ba2fb1ad98ed81b62e2827639b71d6ec9b0ae9c
Checking out files: 100% (3284/3284), done.

$ cd jedi
Build the Jedi IDE The build system follows the usual configure / make methodology but as the underlying Scheme system already represents a platform independant abstraction, there is no need to use the low-level GNU tools. The build system is fully implemented in Scheme, accessed using the ./jam script.
$ ./jam
JazzScheme Build System v2.6

% configure
<default>
  system: gambit
  platform: windows
  safety: release
  ...

% make
...

% quit
Launch Jedi You will find the Jedi executable inside the "bin" folder. Launching Jedi is a good indicator of whether the installation was successful or not.
$ bin/jedi
Getting Started
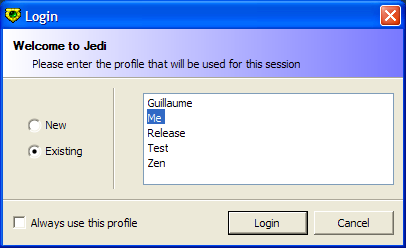
Installation After installing JazzScheme, open up the bin directory and locate jedi.exe to launch Jedi, the JazzScheme IDE. Login Next, you will see the Login dialog used to create a new profile or select from a list of existing ones. For the example, we will call the new profile "Me". If you are used to Emacs bindings, Jedi supports a subset of the most common Emacs commands.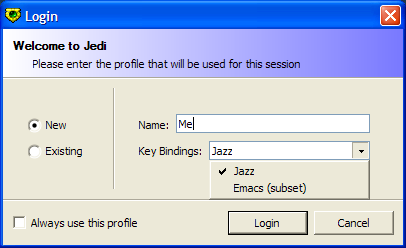 Press "Login". Your new profile will be created in the following directory :
~/.jedi/profiles/lib/profile.me/
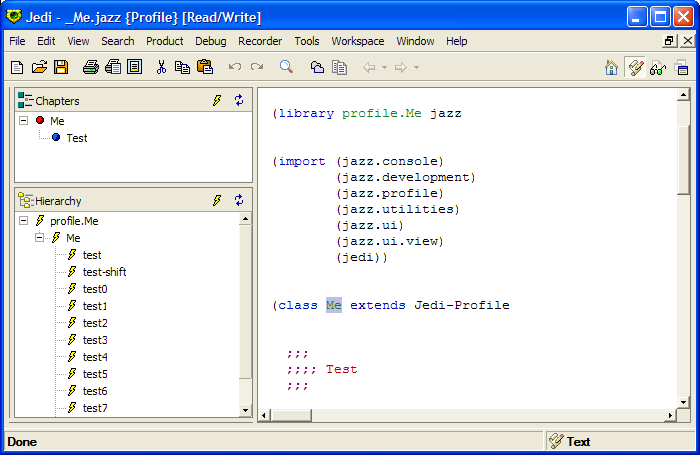
Here's a description of some important files that where created inside your new Me
profile directory :
- settings/Bindings.jml
- settings/Preferences.jml
- settings/Servers.jml
- settings/Workbench.jml
- _Me.jazz
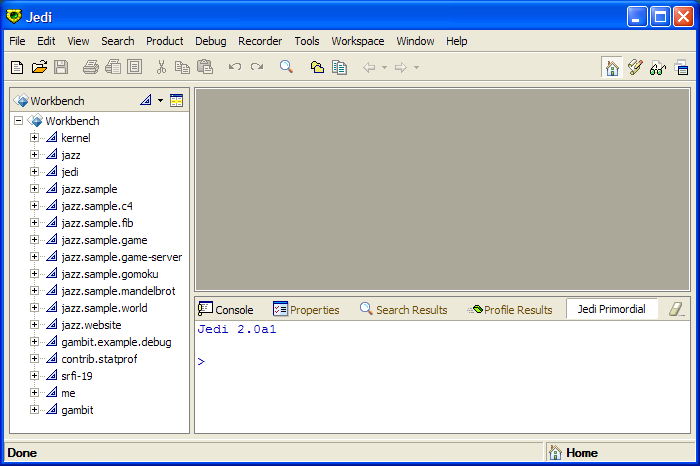
 Jedi IDE
Welcome to the Jedi IDE!
Jedi IDE
Welcome to the Jedi IDE!
 Workspaces
One thing you will notice if you look at the right end side of the toolbar, is a set of 4 icons :
Workspaces
One thing you will notice if you look at the right end side of the toolbar, is a set of 4 icons :
 These buttons can be used to switch the active workspace. Workspaces are groups of related windows, tools, ... that are activated together.
Jedi comes with the following workspaces installed :
These buttons can be used to switch the active workspace. Workspaces are groups of related windows, tools, ... that are activated together.
Jedi comes with the following workspaces installed : -
 Home
Home
-
 Text
Text
-
 Debugger
-
 Groupware
 Note that common tools like the Console are accessible in any workspace.
Cataloging an existing code base
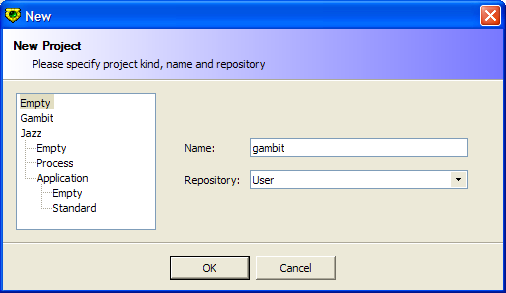
For this tutorial we will catalog the Gambit library. Project First we need a new project for Gambit.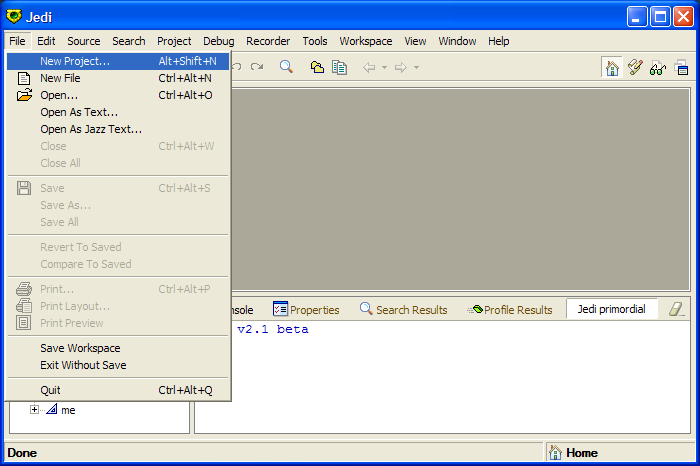 New Project
Note that a project is actually a full-fledged class. This gives projects alot of runtime flexibility but places some constraints on project names. Lets call the project: "gambit".
New Project
Note that a project is actually a full-fledged class. This gives projects alot of runtime flexibility but places some constraints on project names. Lets call the project: "gambit".
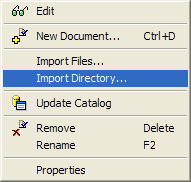
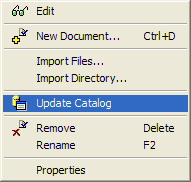
 Import
Now add the Gambit library directory to the project by selecting "Import Directory..." from the project's context menu.
Import
Now add the Gambit library directory to the project by selecting "Import Directory..." from the project's context menu.
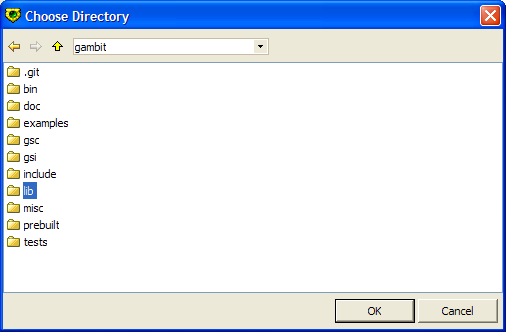
 Locate your Gambit source directory and select "lib".
 Catalog
Now catalog the project's source files. This will scan every source file in the project and build a full cross-references catalog containing information for each definition and every symbol referenced.
Catalog
Now catalog the project's source files. This will scan every source file in the project and build a full cross-references catalog containing information for each definition and every symbol referenced.
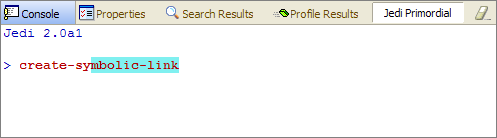
 Explore
With your newly built catalog, edit the Gambit code implementing the
Explore
With your newly built catalog, edit the Gambit code implementing the create-symbolic-link
primitive. Click inside the console and type create-sy
. Notice how Jedi was able to complete the symbol now that it knows about every Gambit definition.
 Now press "alt-period" or "F12". This should edit
 create-symbolic-link
's definition.
Pressing "control-alt-period" or "shift-F12" displays a list of every definition referencing the current symbol. Try it on ##path‑expand
for fun.
Exploring the interface under the hood
One feature of the IDE that can be very useful to newcomers is the view explorer. Invoke the view explorer by selecting the "Debug / Explore Views (F8)" menu. You can now explore every UI object by simply mousing over them. Properties Hovering will show a tooltip describing the object.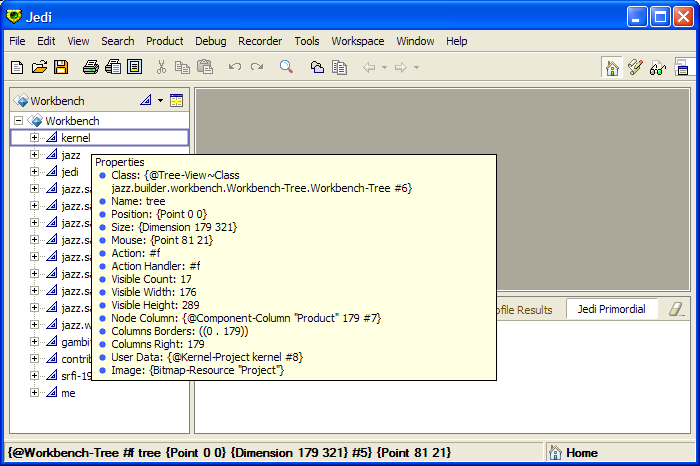 Actions
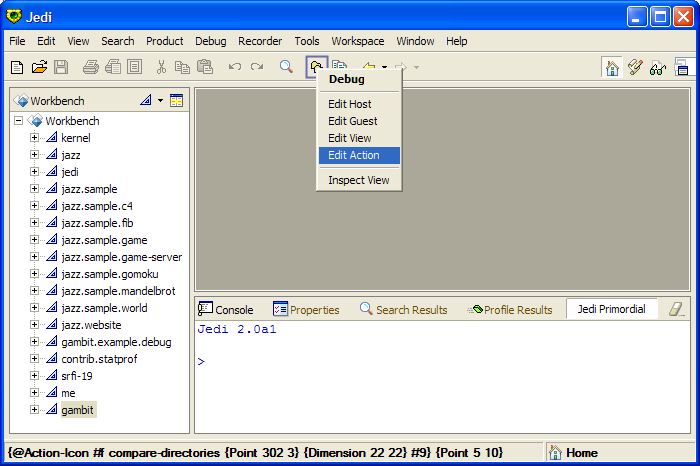
Right-clicking on an object will let you choose various actions. Here lets select "Edit Action" as we are interested in seeing the code that implements this button's action.
Actions
Right-clicking on an object will let you choose various actions. Here lets select "Edit Action" as we are interested in seeing the code that implements this button's action.
 Edit
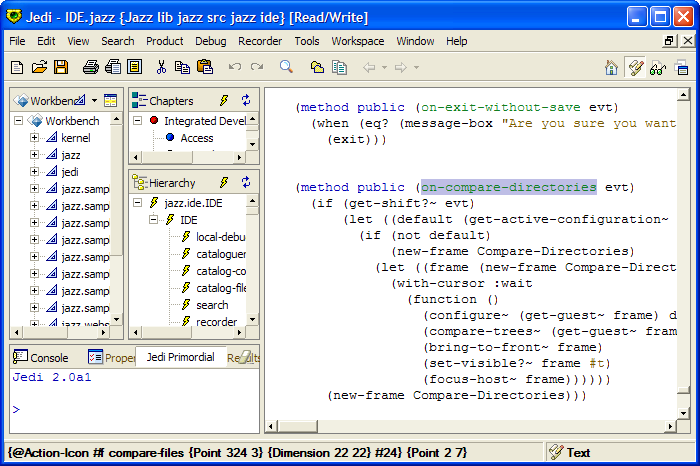
Jedi will open a text editor on the definition of the button implementing "Compare Directories".
Edit
Jedi will open a text editor on the definition of the button implementing "Compare Directories".
 Guest
In Jazz, views that want to be relocatable use a host / guest mecanism where guests can be moved from one host to another. Almost every tool you see in the IDE is implemented as a guest.
Understanding this, we will edit the source code implementing the "Catalogs Manager". Open the tool using the menu "Tool / Catalogs Manager". Press F8, position the mouse anywhere over the catalogs manager and right-click "Edit Guest".
Guest
In Jazz, views that want to be relocatable use a host / guest mecanism where guests can be moved from one host to another. Almost every tool you see in the IDE is implemented as a guest.
Understanding this, we will edit the source code implementing the "Catalogs Manager". Open the tool using the menu "Tool / Catalogs Manager". Press F8, position the mouse anywhere over the catalogs manager and right-click "Edit Guest".
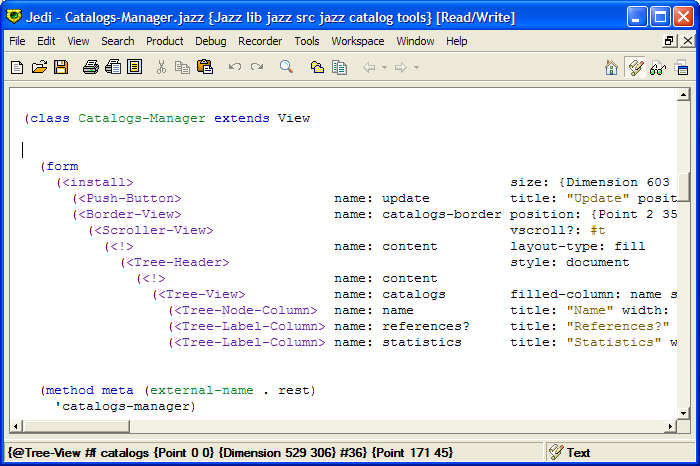
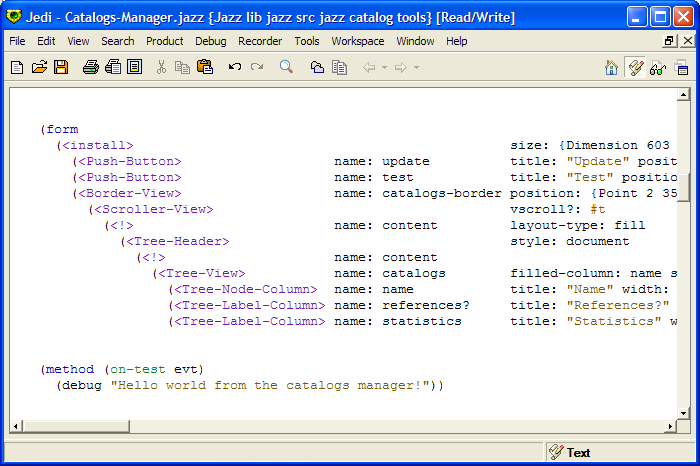
 Form
Jazz implements UI elements through the use of a powerfull markup language where even inheritance relationships be specified between components. A component (here the catalogs manager) specifies its descendants tree through the use of the
Form
Jazz implements UI elements through the use of a powerfull markup language where even inheritance relationships be specified between components. A component (here the catalogs manager) specifies its descendants tree through the use of the form
special form.
 For fun, lets add a new button to the catalogs manager. Duplicate the line containing
 <Push-Button>
and rename every occurence of update
to test
. We should also change its position to lets say {Point 4 7}
.
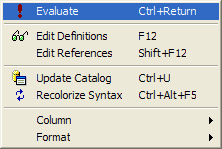
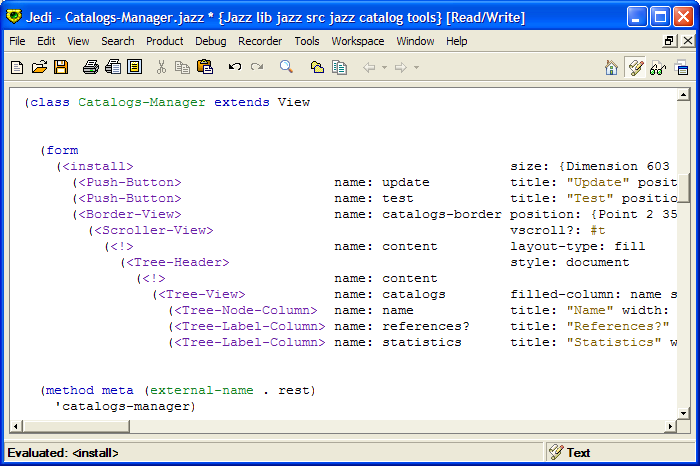 Now right-click anywhere inside the form and select "Evaluate".
 Now all we need is to do is add the
 on-test
method that will get called when we press your new button. Lets put it just after the form and make it do a simple debug
to the console.
Don't forget to evaluate your method before trying out the new button!
 Now lets try your new button. Close the current catalogs manager and open a new one. Your new "Test" button should be there.
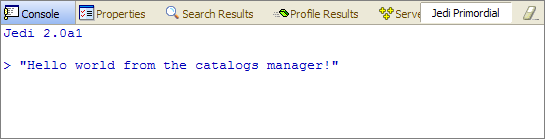
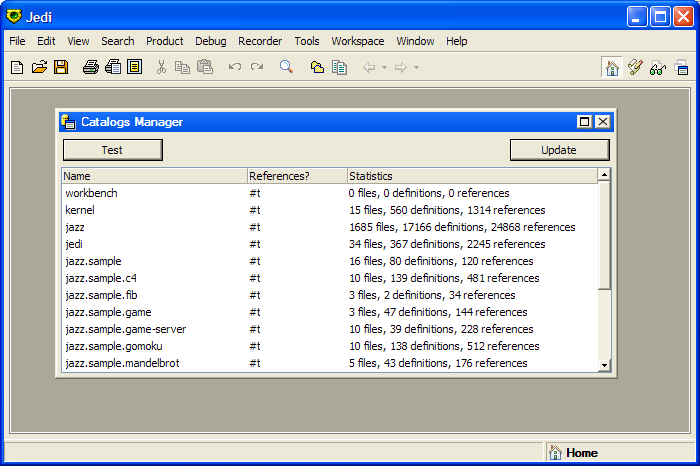 Pressing the "Test" button should display the message to the console.
Executing code
Console The Console is a great place to evaluate code. Use it to experiment freely.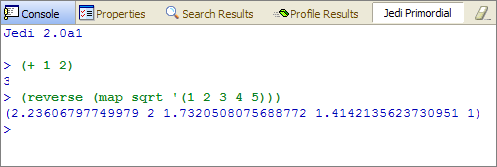 Select the Console either by clicking inside it or by using the Control-Alt-Space shortcut.
 - Be careful, the Console is a full fledged text. The freedom of being inside a freely editable text can be surprising to new users. Expressions to be evaluated must be entered at the end. Note that Control-Alt-Space can be while inside the console to force a fresh prompt at the end.
- The keys bound to move-upward and move-downward (alt-P and alt-N) can be used to insert previous or next expressions. Note that the previous expression does not replace the current line but is inserted instead. This enables one to type some text, use alt-P to insert a previous expression, continue typing, ...
- Another convenient way to access previous expressions, is to place the cursor on the line you want and press Enter. This will copy that line to a fresh line at the bottom.
,(in)
to display the current context.
 Scheme
No context (#f) corresponds to Scheme evaluation.
Scheme
No context (#f) corresponds to Scheme evaluation.
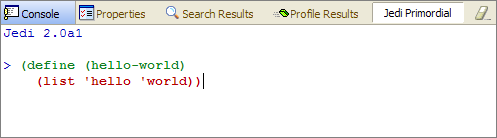
 Notice how the definition was entered on multiple lines. The console is a full-fledged repl that simply sends every input line to the remote debuggee in this case the Jedi IDE itself that is waiting for the read to complete. To help distinguish between sent and unsent input, the console colors sent input in green
and unsent input in red
.
Notice how the definition was entered on multiple lines. The console is a full-fledged repl that simply sends every input line to the remote debuggee in this case the Jedi IDE itself that is waiting for the read to complete. To help distinguish between sent and unsent input, the console colors sent input in green
and unsent input in red
.
 Unit
Lets try and evaluate code in the context of a unit.
Unit
Lets try and evaluate code in the context of a unit.
 Object
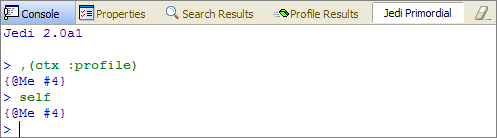
The context can also be a specific object. Various important objects have aliases that can be used to quickly refer to them like for instance :profile for your profile object.
Object
The context can also be a specific object. Various important objects have aliases that can be used to quickly refer to them like for instance :profile for your profile object.
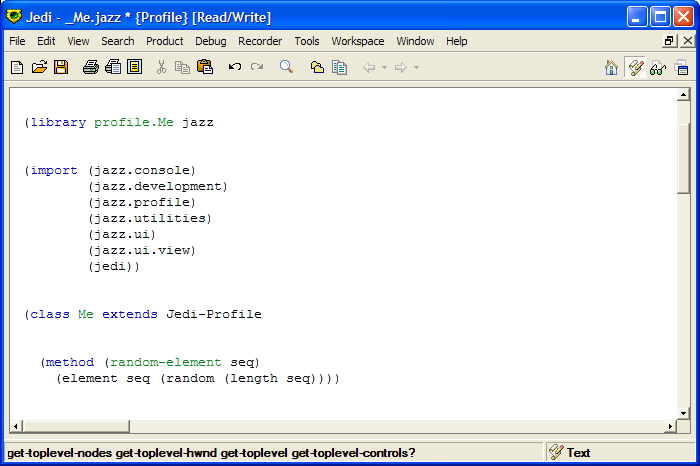
 Profile class
For more flexibility, you can execute code from your profile class. Open your Me.jazz profile class by double-clicking it in the worbench.
Profile class
For more flexibility, you can execute code from your profile class. Open your Me.jazz profile class by double-clicking it in the worbench.
 Code
Enter the following method inside the Me class:
Code
Enter the following method inside the Me class:
(method (random-element seq)
  (element seq (random (length seq))))
You should have something like :
 Evaluate it by placing the cursor anywhere inside the method and pressing control-Enter. The
 random-element
method is now defined! You can easily experiment with it in the Console. Try evaluating (random-element '(a b c d e))
a couple times...
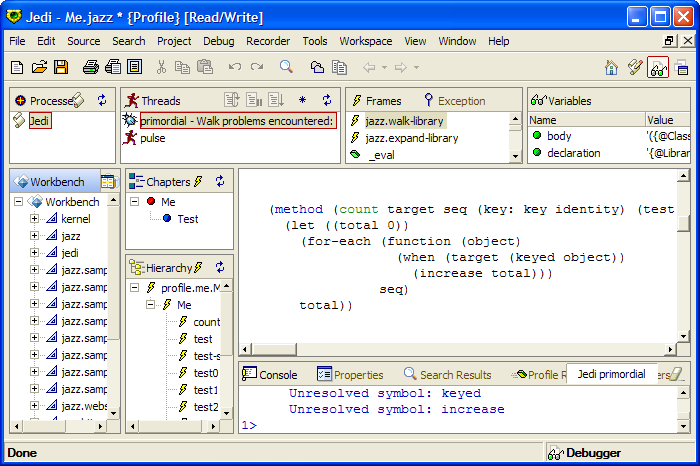
Unresolved Symbols
Now for something a bit more complex, enter the following method inside your Me class: (method (count target seq (key: key identity) (test: test eqv?)) (let ((total 0)) (for-each (lambda (object) (when (target (keyed object)) (increase total))) seq) total))When you evaluate it, you will get the following error displayed in the console:
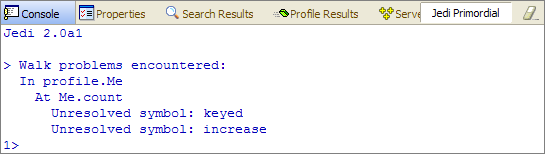 The Jazz codewalker detected unresolved symbols in your code. Note that our typos where catched early without having to actually execute the code.
Also note in the upper-right corner that the debugger is notifying you. In this case, one of the debugged processes's thread reported an exception.
The Jazz codewalker detected unresolved symbols in your code. Note that our typos where catched early without having to actually execute the code.
Also note in the upper-right corner that the debugger is notifying you. In this case, one of the debugged processes's thread reported an exception.
 Debugger
Clicking the debugger's red icon will bring you to the debugger's workspace.
Debugger
Clicking the debugger's red icon will bring you to the debugger's workspace.
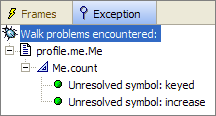
 Exception
If you want more detail on the exception, select the "Exception" palette just next to the "Frames" one. For walk problems, selecting a row will highlight the source code locations in red.
Exception
If you want more detail on the exception, select the "Exception" palette just next to the "Frames" one. For walk problems, selecting a row will highlight the source code locations in red.
 Now that you understand the error and how to correct it, the first thing you should do is return the thread in error to the previous repl level. Do this by right-clicking the thread in error (here the "Primordial" thread) in the "Threads" palette and selecting "Resume event loop".
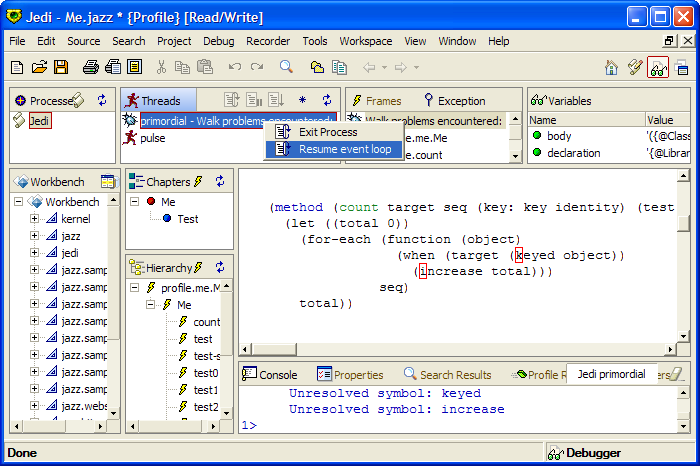 Restarts
For the curious about why we are resuming an event loop and not a repl. In a GUI the event loop acts as a stable looping point that can be restarted after an exception has occured just like a repl.
Note that restarting the event loop is just a special case of invoking an active restart. As you can see in the previous image, there where actually 2 restarts that could have been invoked :
Restarts
For the curious about why we are resuming an event loop and not a repl. In a GUI the event loop acts as a stable looping point that can be restarted after an exception has occured just like a repl.
Note that restarting the event loop is just a special case of invoking an active restart. As you can see in the previous image, there where actually 2 restarts that could have been invoked : - Exit process
- Resume event loop
keyed
to key
and increase
to increase!
and re-evaluate the method.
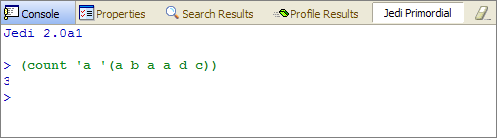
Lets try our new method by evaluating (count 'a '(a b a a d c))
in the Console. You will get the following runtime exception:
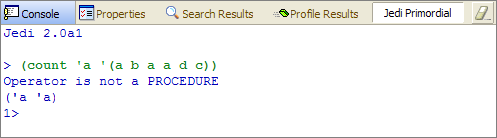 If you know what the problem is from just reading the error message, you can clear the repl level directly from the console by pressing control-D. Else, once again click the debugger's red icon :
Click the "Me.count" frame in the "Frames" palette to see the frame's source code and variables :
If you know what the problem is from just reading the error message, you can clear the repl level directly from the console by pressing control-D. Else, once again click the debugger's red icon :
Click the "Me.count" frame in the "Frames" palette to see the frame's source code and variables :
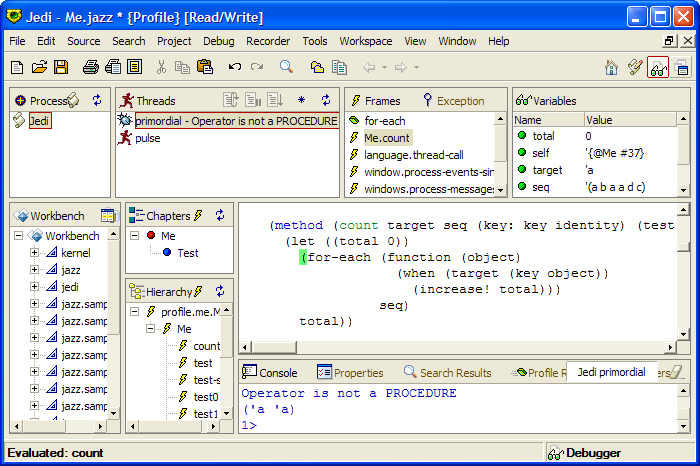 From the value of the "target" variable it should be clear that we forgot the
 test
call.
Corrected, we finally have our working version of count
!
(method (count target seq (key: key identity) (test: test eqv?))
  (let ((total 0))
    (for-each (lambda (object)
                (when (test target (key object))
                  (increase! total)))
              seq)
    total))
Console evaluation
The Jedi console is a full-fledged REPL with history navigation, tab completion and syntax highlighting.
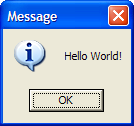
Jedi v2.1.24 beta

> 'hello-world
hello-world
>
Evaluating Scheme code
The Jedi console supports multiple languages. The evaluation context determines how evaluation is done.
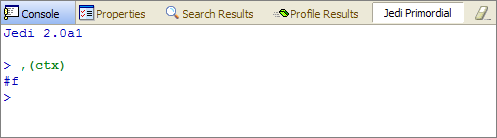
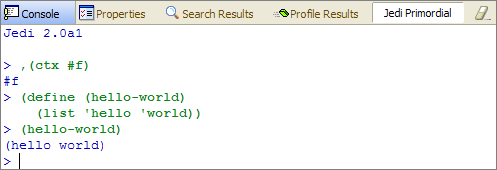
To evaluate pure Scheme code, set the console context to no context by using the ',(in #f)' command.
> ,(in #f)
#f
> (define (hello-world)
    (list 'hello 'world))
> (hello-world)
(hello world)
>
Lets try some Gambit specific stuff.
> (define (hello-world)
    (##list 'hello 'world 'from 'gambit (system-version)))
> (hello-world)
(hello world from gambit 405002)
>
Evaluating Jazz code
Module contextJazz code must exist inside a module.
Let's change the context to jazz.debuggee so we can directly access the debugging functions of that module.
> ,(in 'jazz.debuggee)
jazz.debuggee
> (inspect (list 'hello 'world))
>
Object context
The context can also be set to a specific object. Let's set the context to the Jedi application giving us direct access to its fields.
> ,(in (get-application))
{Jedi #3}
> (list 'hello 'world 'from self (process-version))
(hello world from {Jedi #3} {Version 2 1 24 beta})
>
Various key objects have keyword aliases, the most important one being ':profile' for your profile instance. Let's set the context to it and define a new hello-world method in our profile.
Note that for simplicity, every profile related tutorial will assume your profile name is 'Me'. If you want to be able to try out the examples as-is, login to Jedi, create a profile named 'Me' and log in using it.
> ,(in :profile)
{Me #42}
> (method (hello-world)
    (list 'hello 'world 'from self))
> (hello-world)
(hello world from {Me #42})
>
Units
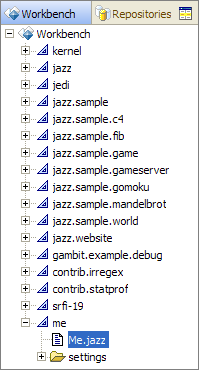
UnitsFor our first unit, we will use the existing Projects repository located at ~/.jedi/projects and the existing profile.me package located at ~/.jedi/profiles/lib/profile.me.
1- Create the unit ~/.jedi/profiles/lib/profile.me/hello/unit.scm, containing:
(unit hello.unit

(display "Hello World!"))
In the console:
> (require hello.unit)
Hello World!
>
Packages
In this sample we will create a simple package inside the existing Projects repository. We will do it manually without using the IDE repository management tools.
1- Create the package definition file ~/.jedi/projects/lib/world/.package, containing:
(package world)
2- Create the unit ~/.jedi/projects/lib/world/hello/unit2.scm, containing:
(unit hello.unit2

(display "Hello World2!"))
3- Because Jedi's runtime has already cached packages, you can either restart the IDE or go to the "Repositories" palette, right click the "Projects" repository and select "Scan for new Packages".
In the console:
> (require hello.unit2)
Hello World2!
>
Repositories
Let's now create a new 'Tutorial' repository manually without using the IDE repository-management tools.
1- Create the repository definition file ~/tutorial/.repository, containing:
(repository Tutorial)
2- Move the previously-created world package to the new repository. E.g. move the ~/.jedi/projects/lib/world/ directory inside ~/tutorial/.
This ability to transparently move packages from one repository to another one is a key feature of the unit system.
3- Add the following entry to your ~/.jazz/.jazzini initialization file:
(jazz.install-repository-if-exists "~/tutorial/")
4- Restart the IDE
In the console:
> (require hello.unit2)
Hello World2!
>
Modules
ModulesLet's create our first jazz module. Note that since a module is a unit, everything above applies to it too.
1- Create the module ~/tutorial/world/hello/module.jazz, containing:
(module hello.module jazz

(definition public (hello-world)
  (inspect (list hello world))))
In the console:
> (import hello.module)
Walk problems encountered
  In hello.module
    At hello-world
      Unresolved symbol: inspect
      Unresolved symbol: hello
      Unresolved symbol: world
1>
We receive this walk-time error as modules code-walk their code and will report any unresolved symbols.
First let's clear the error level by pressing control-d in the console:
1>
>
And now let's fix the unresolved symbols:
(module hello.module jazz

(import (jazz.debuggee))

(definition public (hello-world)
  (inspect (list 'hello 'world))))
In the console:
> (import hello.module)
> (hello-world)
>
Native Scheme access
We will now use the 'native' special-form to access Scheme code from a Jazz module.
Note that we are using a unit for our Scheme code solely so it is easier to load using the 'require' special-form. The code could also be in a pure Scheme file that we would then load manually using Scheme's load function.
1- Create the Scheme unit ~/tutorial/world/hello/native.scm, containing:
(unit hello.native

(define (hello-world)
  (list 'hello 'world 'from 'the 'Scheme 'world!)))
2- Create the Jazz module ~/tutorial/world/hello/access.jazz, containing:
(module hello.access jazz

(require hello.native)

(native hello-world)

(display (hello-world)))
In the console:
> (require hello.access)
(hello world from the Scheme world!)
>
Products Finally, let's create a product so we can run the previous code from the command line.
1- Create the unit that will run the product ~/tutorial/world/hello/run.jazz, containing:
(module hello.run jazz

(register-product-run 'hello
  (lambda (descriptor)
    (load-unit 'hello.access))))
2- Modify the existing world package to register the product ~/tutorial/world/.package:
(package world

  (products (hello (run hello.run))))
From the command line:
$ bin/kernel -run hello
(hello world from the Scheme world!)
Processes
Now let's try our first IDE-generated process.
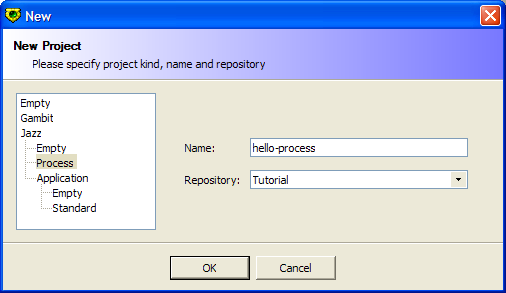
1- Create an 'hello-process' process by selecting the menu item "File / New Project...":
If we expand 'hello-process' in the Workbench:
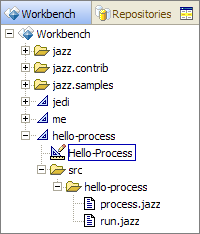
We see the IDE has generated the following files for us:
- The package: ~/tutorial/hello-process/.package
- The process unit: ~/tutorial/hello-process/src/hello-process/process.jazz
- The run unit: ~/tutorial/hello-process/src/hello-process/run.jazz
- The Jedi manifest: ~/tutorial/hello-process/src/project/hello-process/Hello-Process-Manifest.jazz
- The Jedi project: ~/tutorial/hello-process/src/project/hello-process/Hello-Process-Project.jazz
2- Let's modify the generated process code:
;;;==============
;;;  JazzScheme
;;;==============
;;;
;;;; Hello-Process
;;;


(module hello-process.process jazz


(import (jazz.platform)
        (jazz.system)
        (jazz.system.process))


(class Hello-Process-Process extends Process


  (method override (start-process)
    (system-message "Hello World!")
    (exit-process))))
Now let's run it using the menu item "Project / Run" or from the command line by launching 'kernel -run hello-process'.